WebRTC samples解説

https://webrtc.github.io/samples/

ソースコードはgithub (各ページにリンクあり)

動作テスト: 各ページをそのまま利用
自分で動かす場合は、A) httpsサーバに置く、B) ローカルWebサーバ (httpでもよい) (プログラムのローカル実行では一部の権限が得られない)
Webブラウザ: Edge(Chrome), Safari, Firefox
細部の仕様が異なる。


getUserMedia() カメラ、マイク利用の基本

  1. Basic getUserMedia demo (ビデオだけ)
    
    //
    const constraints = window.constraints = {
      audio: false,
      video: true
    }; // オーディオなし
    //
    async function init(e) {
     const stream = await navigator.mediaDevices.getUserMedia(constraints); 
    // awaitを使うためにfunctionはasync。エラー処理はtry/catch構文で


  2. Use getUserMedia with canvas (とりあえず不要)
    -- ビデオをcanvas内に表示してスナップショットを撮る
    
    ---- index.html
     <video playsinline autoplay></video>
        <button>Take snapshot</button>
        <canvas></canvas> // 空のキャンバスを用意
    --- main.js
    const video = document.querySelector('video');
    const canvas = window.canvas = document.querySelector('canvas');
    canvas.width = 480;
    canvas.height = 360;
    
    const button = document.querySelector('button');
    button.onclick = function() {
      canvas.width = video.videoWidth;
      canvas.height = video.videoHeight;
      canvas.getContext('2d').drawImage(video, 0, 0, canvas.width, canvas.height);
    };


  3. Use getUserMedia with canvas and CSS filters (不要)

    
    -- index.html
    -- head 
    // style でフィルタ指定(.none, .blur, ...), 
             .video object-fit: cover;
    -- body
    // select "none", "blur", "grayscale", "invert", "sepia"
    -- main.js 
    video.className = 上記の値


  4. Choose camera resolution (必要) -- constraintsの書き方
    
    -- index.html
    const fullHdConstraints = {
      video: {width: {exact: 1920}, height: {exact: 1080}}
    }; // exact は 正確にマッチ、Webブラウザで変換される場合もありそう
    // constraints を変更、track.applyConstraints() で有効に
    // videoの表示サイズを合わせて変更
    // deviceIdを指定していないので、カメラが切り替わることがある (新発見)


  5. Audio-only getUserMedia() output to local audio element
    -- Chrome (Linux) のWebcamオーディオの遅れがひどい
    
    --index.html
    audio with controls autoplay
    --js/main.js
    const constraints = window.constraints = {
      audio: true,
      video: false
    }; // Firefoxでは明らかに音質低下 
    
    audio.srcObject = stream; // streamはgetUserMedia()のreturn value
    // default autoGainControl, noiseSuppression, echoCancellation)
    // Chrome (Linux) では不明 (効いていないかも)、windows, macOS Safariでは?


  6. Audio-only getUserMedia() displaying volume (UIのレベルメーター)
    HTML meter elementを使う。Web Audio APIのScriptProcessorNode
    
    -- index.html
    <meter high="0.25" max="1" value="0"></meter>
    -- js/soundmeter.js
    this.mic = this.context.createMediaStreamSource(stream);
        this.mic.connect(this.script);
        this.script.connect(this.context.destination);
    //
    this.script = context.createScriptProcessor(2048, 1, 1);
      const that = this;
    this.script.onaudioprocess = function(event) {}
    //
    that.instant = Math.sqrt(sum / input.length);
        that.slow = 0.95 * that.slow + 0.05 * that.instant;
        that.clip = clipcount / input.length;
    -- js/main.js


  7. Record stream
    録画、再生、ダウンロード、 select recording format, echo cancellation
    
    -- js/main.js (scriptでasync指定)
    const constraints = {
        audio: {
          echoCancellation: {exact: hasEchoCancellation} // あればon
      // autoGainControl, noiseSuppression指定なし
      // getUserMedia() 後の変更はなし (変更できるのはFirefoxだけ?)
        },
        video: {
          width: 1280, height: 720 // ここはゆるくしておいたほうがよい?
        }
      };
    
    const possibleTypes = [
        'video/webm;codecs=vp9,opus',
        'video/webm;codecs=vp8,opus',
        'video/webm;codecs=h264,opus',
        'video/mp4;codecs=h264,aac',
      ];
    return possibleTypes.filter(mimeType => {
        return MediaRecorder.isTypeSupported(mimeType);
    }); // 総当り -- selectで選択
    
    // Recording
    recordedBlobs = [];
    const mimeType = codecPreferences.options[codecPreferences.selectedIndex].value;
    const options = {mimeType};
    
    mediaRecorder = new MediaRecorder(window.stream, options);
    // handlerはonstop (表示のみ), 
    // ondataavailable (event) recordedBlobs.push(event.data);
    mediaRecorder.start();
    mediaRecorder.stop();
    // play (やや無駄あり?)
    const mimeType 
    = codecPreferences.options[codecPreferences.selectedIndex].value.split(';', 1)[0];
      const superBuffer = new Blob(recordedBlobs, {type: mimeType});
      recordedVideo.src = null;
      recordedVideo.srcObject = null;
      recordedVideo.src = window.URL.createObjectURL(superBuffer);
      recordedVideo.controls = true;
      recordedVideo.play();
    // download
    const blob = new Blob(recordedBlobs, {type: 'video/webm'});
      const url = window.URL.createObjectURL(blob);
      const a = document.createElement('a');
      a.style.display = 'none';
      a.href = url;
      a.download = 'test.webm';
      document.body.appendChild(a);
      a.click();
      setTimeout(() => {
        document.body.removeChild(a);
        window.URL.revokeObjectURL(url);
      }, 100);
    });


  8. Screensharing with getDisplayMedia
    Firefoxでは音声が拾えない -- Monitor of 内部オーディオ (Mic off)
    
    --index.html
    <meta name="viewport" content="width=device-width, user-scalable=yes, initial-scale=1, maximum-scale=1"> // 他も同様
    //
    video id="gum-local" autoplay playsinline muted // muteされている
    -- js/main.js
    
    if ((navigator.mediaDevices && 'getDisplayMedia' in navigator.mediaDevices)) {
    // 使用可能判定
    navigator.mediaDevices.getDisplayMedia({video: true}) // audioなし(なぜ?)


  9. Control camera pan, tilt, and zoom
    使えるか判定 (普通は不要)
    
    -- js/main.js
    const constraints = window.constraints = {
      video: {
        pan: true, tilt: true, zoom: true
      }
    };
    
    const [track] = [window.track] = stream.getVideoTracks();
      const capabilities = track.getCapabilities();
      const settings = track.getSettings();
    
    for (const ptz of ['pan', 'tilt', 'zoom']) {
        // Check whether camera supports pan/tilt/zoom.
        if (!(ptz in settings)) {
          errorMsg(`Camera does not support ${ptz}.`);
          continue;
        }
    // omitted
     const constraints = {advanced: [{[ptz]: input.value}]};
            await track.applyConstraints(constraints);


Devices:

  1. Choose camera, microphone and speaker
    FirefoxはOK 外部ディバイスがあるとgetUserMedia()に時間がかかる。
    ChromeはOK、Safariはaudiooutputの情報を戻さない
    
    -- main.js
    start() 
    
    // 旧ストリームがあれば閉じる
    if (window.stream) {
        window.stream.getTracks().forEach(track => {
          track.stop();
        });
      }
    // なるほど
    const constraints = {
        audio: {deviceId: audioSource ? {exact: audioSource} : undefined},
        video: {deviceId: videoSource ? {exact: videoSource} : undefined}
    };
    navigator.mediaDevices.getUserMedia(constraints)
      .then(gotStream)
      .then(gotDevices)
      .catch(handleError);
    //
    gotStream()
    videoElement.srcObject = stream;
      // Refresh button list in case labels have become available
      return navigator.mediaDevices.enumerateDevices();
    } // streamをvideoに渡したまま
    
    // 変更あればやり直し (旧streamはそのまま?)
    audioInputSelect.onchange = start;
    audioOutputSelect.onchange = changeAudioDestination;
    videoSelect.onchange = start;


  2. Choose media source and audio output
    ChromeはOK、FirefoxはNG。ボタンが2つずつあるのはバグ?
    
    navigator.mediaDevices.enumerateDevices().then(gotDevices).catch(handleError);
    // gotStream()の外 (メイン) で最初に1回実行されるだけ


Stream capture:

captureStream() (mozCaptureStream()) の使い方
Firefoxでは音声キャプチャできない (Monitor of のオーディオは可能)
  1. video to video
    
    if (leftVideo.captureStream) {
        stream = leftVideo.captureStream(fps);
      } else if (leftVideo.mozCaptureStream) {
        stream = leftVideo.mozCaptureStream(fps);
      } else { // not supported
    rightVideo.srcObject = stream;


  2. To Peer
    This demo requires Firefox 47, Chrome 53 with Experimental Web Platform features enabled from chrome://flags. 今はOK
    Peerとの情報交換は直接書き込み。streamはlocalhost経由で送受信。
    
    --js/main.js
    stream = leftVideo.captureStream(); // or mozCaptureStream()
    
    pc1 = new RTCPeerConnection(servers);
    // handlers
      pc1.onicecandidate = // addIceCendidate (event.candidate) 
      pc1.oniceconnectionstatechange = // console.log 
    pc2 = new RTCPeerConnection(servers);
      pc2.onicecandidate = // pc1と同様
      pc2.oniceconnectionstatechange = // console.log
      pc2.ontrack = 
       // 内容 if (rightVideo.srcObject !== event.streams[0]) {
           rightVideo.srcObject = event.streams[0];
    
    stream.getTracks().forEach(track => pc1.addTrack(track, stream));
    // offerの前に済ませておく
    
    const offerOptions = {
      offerToReceiveAudio: 1,
      offerToReceiveVideo: 1
    }; // Deprecated
    pc1.createOffer(onCreateOfferSuccess, 
           onCreateSessionDescriptionError, offerOptions); // 古い書き方
    -- desc = createOffer() でよい
    pc1.setLocalDescription(desc);
    pc2.setRemoteDescription(desc); // 通信なしで直接 
    desc = pc2.createAnswer();
    pc2.setLocalDescription(desc);
    pc1.setRemoteDescription(desc);


  3. Canvas to video element
    Teapotの回転が面白いがその部分のコードが多い。本質は canvas対象のcaptureStream() js/main.js
    
    const stream = canvas.captureStream();
    video.srcObject = stream; // これだけ


  4. Canvas to peer
    Canvasをcaptureする以外は上記の例と同じ
  5. Record a stream from a canvas
    
    const mediaSource = new MediaSource();
    const stream = canvas.captureStream(); 
    sourceBuffer = mediaSource.addSourceBuffer('video/webm; codecs="vp8"');
    // 使っていない??
    mediaRecorder = new MediaRecorder(stream, options);
      options = {mimeType: 'video/webm'};
      options = {mimeType: 'video/webm,codecs=vp9'};
      options = 'video/vp8';
      の順にtry 


  6. Guiding video encoding with content hints
    ビデオ品質の指定 (MediaStreamTrack Content Hints) の使用例
    Firefoxでは、一番上 (high bitrage) しか表示されない。 ChromeはOK
    
    motionStream = srcStream.clone();
    hints 'fluid' 'motion' -- 2通り試す?
    
    detailedStream = srcStream.clone();
    hints 'detailed' 'detail' -- 2通り試す?
    
    // Invalid video track contentHint: 'fluid'
    // Invalid video track contentHint: 'detailed'
    
    if ('contentHint' in track) {
      track.contentHint = hint;


https://www.w3.org/TR/mst-content-hint/
audio: "", "speech", "speech-recognition", "music"
video: "", "motion", "detail", "text"

RTCPeerConnection:

Controlling peer connectivity。多いのでかなり難しいことがわかる。 ただし、SignalingサーバはAPIに含まれないので例がほとんどない
  1. Basic peer connection demo in a single tab
    videoをpeerに送る例と同じ
    
    -- js/main.js
    (start)
    const stream 
      = await navigator.mediaDevices.getUserMedia({audio: true, video: true});
    // audio, video オプションなし
    localVideo.srcObject = stream;
    localStream = stream;
    
    (call)
    // localPeer, remotePeerとコールバック関数指定
    // ontrack でremoteVideo.srcObject = e.streams[0];
    
    localStream.getTracks().forEach(track => pc1.addTrack(track, localStream));
    const offer = await pc1.createOffer(offerOptions);
    // offerとanswerを直接書き込み
    
    (hangup)
    pc1.close();
    pc2.close();
    pc1 = null;
    pc2 = null; // nullにする必要あるか? (念押し)


  2. Basic peer connection demo between two tabs
    offer, answerに同じbrowserのtab間での通信 (Broadcast Channel API) を利用。 2つのtabで同時に動かして、それぞれStart。2つのtabでビデオが キャプチャできるらしいのが不思議、どちらの音声を聞いているのかわからん。
    
    -- js/main.js async
    通信
    const signaling = new BroadcastChannel('webrtc'); // 名前は任意
    (event handler)
      signaling.onmessage
        if (!localStream) return; // not ready (受信だけはだめにしてある)
        switch (e.data.type) 
           offer, // offer受信処理
           answer, // ansewer受信処理
           candidate, // candidate受信処理
           ready, -- if (pc) return; makeCall();
             // 自分のPeerがまだなければ
           bye, default // 自由に
    (start button)
      getUserMedia(); signaling.postMessage{{type: 'ready'}};
    
    (makeCall())
      (createPeerConnection)
      pc = new RTCPeerConnection();
      pc.onicecandidate = e => { 
          const message = {type: 'candidate', candidate: null};
        if (e.candidate) {
          message.candidate = e.candidate.candidate;
          message.sdpMid = e.candidate.sdpMid;
          message.sdpMLineIndex = e.candidate.sdpMLineIndex;
          // 要確認 (sdpMid, sdpMLineIndexは不要かも)
        }
        signaling.postMessage(message);
         pc.ontrack = remoteVideo.srcObject = e.stream[0];
    
        localStream.getTracks().forEach でpc.addTrack(track, localStream);
        // 双方送信
      }
    
      offer = await.pc.createOffer()
      signaling.postMessage({type: 'offer', sdp: offer.sdp}); // offer送信
      setLocalDescription(offer); // localDescriptionに設定
    
    (handleOffer)
      const pc = createPeerConnection(); // pcが抜けている (bug?)
      pc.setRemoteDescription(offer)
      pc.createAnswer();
      signaling.postMessage({type: 'answer', sdp: answer.sdp});
    
      pc.setLocalDescription(answer);
    
    (handleAnswer)
      pc.setRemoteDescription(answer);
    (handleCandidate)
      pc.addIcecandedate(candidate); or null set ("" で終りが正しい?)


  3. Peer connection using Perfect Negotiation
    複雑そう。両方がofferを送る可能性がある場合に使う。 onnegotiationneededが発火

    
    -- js/main.js (import peer.js)
    メッセージはiframeをtargetとしてtarget.postMessage()
    受信はwindow.onmessage = 


  4. Audio-only peer connection demo
    オーディオencoding変更、ビットレートなど表示
    
    -- index.html
    select "opus", "ISAC", "G722", "PCMU", "red" // opusがベスト
    // 描画は ../../../js/third_party/graph.js
    -- js/main.js
    const codecPreferences = document.querySelector('#codecPreferences');
    const supportsSetCodecPreferences = window.RTCRtpTransceiver &&
      'setCodecPreferences' in window.RTCRtpTransceiver.prototype;
    if (supportsSetCodecPreferences) {
      codecSelector.style.display = 'none';
    
      const {codecs} = RTCRtpSender.getCapabilities('audio');
      codecs.forEach(codec => {
        if (['audio/CN', 'audio/telephone-event'].includes(codec.mimeType)) {
          return;
        }
        const option = document.createElement('option');
        option.value = (codec.mimeType + ' ' + codec.clockRate + ' ' +
          (codec.sdpFmtpLine || '')).trim();
        option.innerText = option.value;
        codecPreferences.appendChild(option);
      });
    // negotiationは直接代入
    (call())
      new RTCPeerConnecition()
      getUserMedia()
       gotStream() -- addTrack()
     if (supportsSetCodecPreferences)
    // SDPの直接書き換え setPtime() は使えるかも
    // 統計情報取得
    const sender = pc1.getSenders()[0];
      if (!sender) {
        return;
      }
      sender.getStats().then(res => {
        res.forEach(report => {


  5. Change bandwidth on the fly
    動かしながらビットレートを変更 (video only)
    
    -- index.html
    select 75, 125, 250, ... unlimited (kbps)
    -- js/main.js
    navigator.mediaDevices.getUserMedia({video: true})
    
    
    bandwidthSelector.onchange = // UIイベント
    
    // browserチェック
    // "setParameters' in RTCPRtpSender.prototype
    const sender = pc1.getSenders()[0];
    const parameters = sender.getParameters();
    'unlimited'ならdelete parameters.encodings[0].maxBitrate;
    parameters.encodings[0].maxBitrate = bandwidth * 1000;
    sender.setParameters(parameters)
    
    // setParameters() がだめなら
    offer = pc1.createOffer()
     pc1.setLocalDescription() 
     pc1.remoteDescription.sdp の書き換え
     pc1.setRemoteDescriotion(書き換えたsdpを含むdesc)


  6. Change codecs before the call
    対象はビデオ、Firefoxはdefaultのみ codec is undefined main.js 216。 Chromeはstart後多数の選択肢。ConsoleにSDPパラメータが表示される。
    
    -- js/main.js
    // Firefoxはunsupported
    const supportsSetCodecPreferences = window.RTCRtpTransceiver &&
      'setCodecPreferences' in window.RTCRtpTransceiver.prototype;
    // 一覧
    if (supportsSetCodecPreferences) {
        const {codecs} = RTCRtpSender.getCapabilities('video');
        codecs.forEach(codec => {
       if (['video/red', 'video/ulpfec', 'video/rtx'].includes(codec.mimeType)) {
         return;
       }
       ... appendChild(option) まで
    
    // Error箇所 codecIdの読み取り
    const stats = await pc1.getStats();
      stats.forEach(stat => {
         if (!(stat.type === 'outbound-rtp' && stat.kind === 'video')) {
           return;
         }
    
    const codec = stats.get(stat.codecId);
    // codec = stats.codec?


  7. Upgrade a call and turn video on
    途中でビデオON (重要かも)
    
    -- js/main.js async
    (start)
       navigator.mediaDevices.getUserMedia({audio: true, video: false })
       gotStream() -- localVideo.srcObject = stream;
    
    (call) -- 通常処理
    
    (upgrad) -- ビデオON
     navigator.mediaDevices.getUserMedia({video: true})
      (stream => {
         const videoTracks = stream.getVideoTracks(); 
         localStream.addTrack(videoTracks[0]);
    
         localVideo.srcObject = null;
         localVideo.srcObject = localStream;
    
         pc1.addTrack(videoTracks[0], localStream);
    // 再negotiation
         pc1.createOffer()
         pc1.setLocalDescription(offer)
         pc2.setRemoteDescription(pc1.localDescription) // offerでよい?
         answer = pc2.createAnswer();
         pc2.setLocalDescription(answer);
         pc1.setRemoteDescription (pc2.localDescription) // answer?


  8. Multiple peer connections at once
    pc1Local から pc1Remote, pc2Localからpc2Remoteにstream。 1対1が2ペア (メッシュじゃない)
    
    -- js/main.js
     pc1Local -- addTrack(), createOffer(), 
                 setLocalDescription, pc1Remote.setRemoteDesc
     pc1Remote -- createAnswer()
        ontrack = gotRemoteStream1 video1.srcObject = e.stream[0]
     pc2Local -- addTrack(), createOffer(), 
        setLocalDesc, pc2Remote.setRemoteDesc
     pc2Remote -- createAnswer()
       ontrack = gotRemoteStream2 -- video2.srcObject = e.stream[1]


  9. Forward the output of one PC into another
    これだけ
    
    const pipes[];
    pipes.push(new VideoPipe(localStream, gotremoteStream));
    

  10. Munge SDP parameters
    OfferとAnswerのSDPを表示しつつ変更 (詳細学習用)
  11. Use pranswer when setting up a peer connection
    offer, answerが普通、UX向上のためのpranswer。 Firefoxにはないかもしれないが、adapterが出すエラーなのでadapter なしならOKかも。
    
    offer = pc1.createOffer()
    pc1.setLocalDescription(offer)
    pc2.setRemoteDescription(offer);
    answer pc2.createAnswer()
    // answer (desc) を書き換え
    desc.sdp = desc.sdp.replace(/a=recvonly/g, 'a=inactive');
    desc.type = 'pranswer';
    
    pc2.setLocalDescription(desc)
    pc1.setRemoteDescription(desc)
    
    (accept) // final answer
    answer = pc2.createAnswer()
    // answer (desc) を書き換え(もとに戻す)
    desc.sdp = desc.sdp.replace(/a=inactive/g, 'a=recvonly');
    desc.type = 'answer';
    pc2.setLocalDescription(desc)
    pc1.setRemoteDescription(desc)


  12. Constraints and stats
    getUserMediaで指定するビデオのフレームレート、サイズ。 Get mediaの前に設定。FirefoxではframeRateに小さい値を指定できないかも。 SenderのmaxBitrateを使ったほうがよさそう。
    
    -- 例
    sender = pc.addTrack(); 
    var encoding = { maxBitrate: 60000, maxFramerate: 5, scaleResolutionDownBy: 2 }
    sender.setParameters({ encodings: [encoding] });
    RTCPeerConnection.getStats() を使う
    

  13. More constraints and stats
    表示が詳しいだけ
  14. RTCPeerConnection and requestVideoFrameCallback()
    Firefoxはだめ (requestVideoAnimationCallback is not supported in your browser. ) 詳しい統計。requestVideoFrameCallback() で遅れを減らせるらしい。
  15. Display createOffer output for various scenarios
    SDPの詳細がわかる。offer.sdpはテキストなので、そのまま表示できる。
    
    outputTextarea.value = offer.sdp;
    

  16. Use RTCDTMFSender
    ダイヤルトーン。目的は電話回線のコール? Firefoxでは音がでない。 alertはなし、原因不明。
    
    (ontrack) gotRemoveStream()
     pc1.getSenders();
     find audioSender
     audioSender.dtmf -- なければalert
     audioSender.ontonechange = dtmfOnToneChange;   
    
    (dtfmOnToneChange)
    
      sendTones(tones) {
        if (dtmfSender && dtmfSender.canInsertDTMF) {
        const duration = durationInput.value;
        const gap = gapInput.value;
        dtmfSender.insertDTMF(tones, duration, gap);
      }


  17. Display peer connection states

    RTCPeerConnectionのpropertyを表示するだけ signalingState connectionState iceConnectionState 他に、peerIdentityが有用?
  18. ICE candidate gathering from STUN/TURN servers
    これはじっくり読んで試す必要がある。 mic/cameraの使用許可を与えないと無意味な表示になるようだ。 defaultのstun:stun.l.google.com:19302 が機能しているかも。 使用中のグローバルIPアドレスが表示される。
    表示例
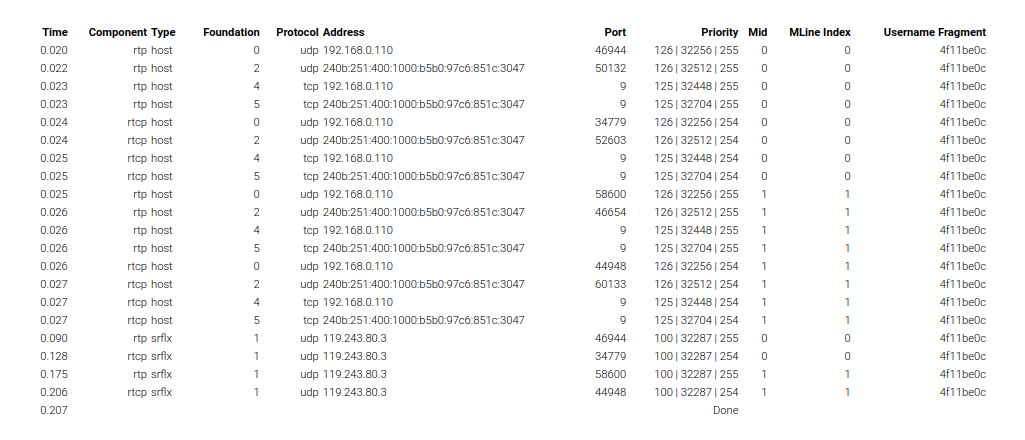
    
    -- js/main.js
    // default server (select option)
    o.value = '{"urls":["stun:stun.l.google.com:19302"]}';
    o.text = 'stun:stun.l.google.com:19302';
    // キャッシュ (localStorage) に記録
    const allServers = JSON.stringify(Object.values(serversSelect.options).map(o => JSON.parse(o.value)));
      window.localStorage.setItem(allServersKey, allServers);
    //
    // Create a PeerConnection with no streams, but force a m=audio line.
      getUserMedia() // addTrack is not necessary
    
      const config = {
        iceServers: iceServers, // STUN, TURN or '' (local)
        iceTransportPolicy: iceTransports, // all, (public), relay
        iceCandidatePoolSize: iceCandidatePoolInput.value // optional
      };
      // peerIdentity // default null
     
      const offerOptions = {offerToReceiveAudio: 1}; // deprecated?
    
      pc = new RTCPeerConnection(config);
      pc.onicecandidate = iceCallback; // 
          candidates.push(event.candidate.candidate)
      pc.onicegatheringstatechange = gatheringStateChange; 
        // if (pc.iceGatheringState === 'complete') getFinalResult()
      pc.onicecandidateerror = iceCandidateError;
    
      offer = pc.createOffer(offerOptions);
      pc.setLocalDescription(offer);
    

  19. Do an ICE restart

    
    // 本質は
    pc1.createOffer(offerOptions)
    

  20. Web Audio output as input to peer connection
    単にAudioContextをつかっただけ
    
    -- js/webaudioextended.js
    
    (constructor)
    window.AudioContext = window.AudioContext || window.webkitAudioContext;
    this.context = new AudioContext();
    (start) 
      BiquadFilter highpass
    (applyFilter)
      mic = this.context.createMediaStreamSource(stream)
      peer = this.context.createMediaStreamDestination();
      // stream -- mic -- filter -- destination
    (renderlocally)
      // mic -- (filter) -- this.context.destination
    
    -- js/main.js async
    const webAudio = new WebAudioExtended(); // in webaudioextended.js
    webAudio.loadSound('audio/Shamisen-C4.wav'); // これが鳴らない? 
    (start)
     webAudio.start();
      (handleSuccess) // 普通にPeer接続
    
    toggleRenderLocally() 
       -- webAudio.renderLocally(renderLocallyCheckbox.checked);
    handleKeyDown() -- webAudio.addEffect();


  21. Peer connection as input to Web Audio
    受信側でオーディオのスペクトル表示
    
    -- index.html
     localVideo playsinline autoplay muted
     remoteVideo playsinline autoplay muted
     canvas
    -- ../../../js/third_party/streamvisualizer.js
    -- js/main.js async
    pc2.ontrack = gotRemoteStream;
    
    gotRemoteStream(e) {
      remoteVideo.srcObject = e.streams[0]; // なぜか再生されない
      const streamVisualizer = new StreamVisualizer(e.streams[0], canvas);
      streamVisualizer.start();
    }


  22. Measure how long renegotiation takes
    適当になんども現在時刻を取得して使う
    const elapsedTime = window.performance.now() - startTime;
  23. Choose scalablilityMode before call - Scalable Video Coding (SVC) Extension

    Codec preferences: ChromeはOK、Firefoxはだめ Scalability Mode: どちらもだめ。未実装?

RTCDataChannel:

  1. Transmit text
    一方向、テキスト送信
    
    // 送信側
    localConnection =  new RTCPeerConnecition();
    sendChannel = localConnection.createDataChannel('sendDataChannel');
     onopen = handler
     onclose = handler
    sendChannel.send(data);
    
    // 受信側
    remoteConnection =  new RTCPeerConnecition();
    remoteConnection.ondatachannel = receiveChannelCallback; // 受信処理
     (receiveChannelCallback)
      receiveChannel = event.channel;
      receiveChannel.onmessage = onReceiveMessageCallback;
      receiveChannel.onopen = onReceiveChannelStateChange;
      receiveChannel.onclose = onReceiveChannelStateChange;
    
  2. Transfer a file
    Split a file into chunks. Reassemble using Blob API. HTML5 progress elements, bitrate, Blob download (export).
    
    -- index.html
    progress id="sendProgress" max="0" value="0" 
    
    -- js/main.js (not async)
    localConnection = new RTCPeerConnection();
    sendChannel = localConnection.createDataChannel('sendDataChannel');
    sendChannel.binaryType = 'arraybuffer';
      event -- onopen, onclose, onerror
    
    remoteConnection = new RTCPeerConnection();
      event -- ondatachannel
    
    // 送信
    (sendChannel.onopen) -- sendData()
    sendProgress.max = file.size;
    receiveProgress.max = file.size;
    const chunkSize = 16384;
    let offset = 0;
    fileReader = new FileReader();
       event -- error, abort, load
    (onload)
    sendChannel.send(e.target.result);
        offset += e.target.result.byteLength;
        sendProgress.value = offset;
        if (offset < file.size) {
          readSlice(offset);
        }
    (readSlice)
        const slice = file.slice(offset, o + chunkSize);
        fileReader.readAsArrayBuffer(slice);
    
     readSlice(0); // 必要?
    (sendData)
    const file = fileInput.files[0];
    
    // 受信
    receiveChannel = event.channel;
    receiveChannel.binaryType = 'arraybuffer';
    receiveChannel.onmessage = onReceiveMessageCallback;
    receiveChannel.onopen = onReceiveChannelStateChange;
    receiveChannel.onclose = onReceiveChannelStateChange;
    
    (onmessage)
    receiveBuffer.push(event.data);
    

  3. Transfer data
    データ転送テスト, bitrate表示なし (計算は簡単)
    
    -- js/main.js
    -- onSendChannelOpen()
    chunkSize = Math.min(localConnection.sctp.maxMessageSize, MAX_CHUNK_SIZE);
      console.log('Determined chunk size: ', chunkSize);
      dataString = new Array(chunkSize).fill('X').join('');
      lowWaterMark = chunkSize; // A single chunk
      highWaterMark = Math.max(chunkSize * 8, 1048576); // 8 chunks or at least 1 MiB
      console.log('Send buffer low water threshold: ', lowWaterMark);
      console.log('Send buffer high water threshold: ', highWaterMark);
      sendChannel.bufferedAmountLowThreshold = lowWaterMark;
      sendChannel.addEventListener('bufferedamountlow', (e) => {
        console.log('BufferedAmountLow event:', e);
        sendData();
    
    -- sendData()
      sendChannel.send(dataString); // chunk
    

  4. Messaging
    1つのdatachannelを双方向に使う
    
    -- index.html
    messaging-sample (component in webcomponents-loader.js?)
    -- main.js
    import {LitElement, html} from 'https://unpkg.com/@polymer/lit-element@0.6.2?module';
    
    class MessagingSample extends LitElement 
    
    -- connect()
    localConnection = new RTCPeerConnection()
      params = {orderd: true}
      localChannel = localConnection.createDataChannel('name', params)
       events -- open, close, message // 受信
    
    remoteConnection = new RTCPeerConnection()
       events -- datachannel 
     -- ondatachannel
       remoteChannel = event.channel;
       remoteChannel.binaryType = 'arraybuffer';
         event -- open, close, message // 受信
    
    this._sendMessage(dir, channel) // 送信
      // dir = elementId (#localOutgoing or #remoteOutgoing)
      // channel: this._localChannel or this._remoteChannel
      channel.send(value);
    

Video chat:

ローカルサーバとクライアント? ソースコードだけ。解説は別紙